Imgs2PDF Adds Document Scanning and a Print Filter for iPhone and iPad
Turning paper documents into a PDF is not just a matter of taking a picture. Page edges may be uneven, the camera angle can create perspective distortion, and indoor lighting can leave one side of the page brighter than the other. Multi-page documents also need to be ordered, reviewed, and processed consistently.
Imgs2PDF now adds a Scan Documents entry point on iPhone and iPad, together with document filters for scanned pages and selected images. Scan several pages in one session, let the system help with edge detection and perspective correction, then return to Imgs2PDF to review, organize, and export a PDF. When a document needs to be printed or shared, the new Print preset provides a document-focused starting point.
The short version
- Camera document scanning: Scan multiple paper pages on iPhone or iPad. The system processes page edges and perspective, then the scanned pages return to Imgs2PDF's image workflow.
- Print filter: Choose Print in the image editor for a document-oriented result that can be easier to read, print, or share. The result still depends on the original photo's lighting, focus, and page content.
- Four document presets: Switch between Original, Enhance, Print, and Black & White, and compare the result with a live preview.
- Batch processing: Turn on Apply to All Images to apply the current preset to a group of pages at once.
- Local processing: Files are processed on the device rather than uploaded to a server, which is useful for assignments, receipts, contracts, and everyday paper documents.
What is Imgs2PDF's document scanner?
Scan Documents is not simply a shortcut to the regular camera. It opens the system document-scanning interface, which is designed for capturing one or more pages of paper. It is useful for:
- class notes, homework, and worksheets;
- invoices, receipts, and expense records;
- contracts, forms, and signed documents;
- book pages, handouts, and paper records that need to be saved together.
During the scan, the system tries to identify the page boundary and correct the crop and perspective. Once you finish a multi-page scan, Imgs2PDF imports the pages one by one so you can check them, change their order, edit the images, and continue with the existing PDF export settings.
Automatic processing is meant to reduce manual cleanup, not to guarantee perfect recognition for every photo. If a page edge is covered, the lighting is too dark, or the paper and background have similar colors, review each imported page before exporting.
How to scan documents with the camera and create a PDF
On iPhone or iPad, the workflow is:
- Open Imgs2PDF and choose Scan Documents on the home screen.
- Point the camera at the paper and follow the system scanning interface to capture one or more pages.
- Finish the scan and confirm the import, then wait for the pages to return to the Imgs2PDF image list.
- Check the page order and orientation. Crop, rotate, or adjust a page if necessary.
- Open an image, choose a document filter, and decide whether to apply it to all pages.
- Continue to the existing PDF settings and export flow to create and share the PDF.
The scan pages arrive with the page processing already performed by the system. Imgs2PDF then handles the local filter and PDF export workflow. This keeps document capture and PDF organization in one place.
What problem does the Print filter solve?
Photos of paper can contain shadows, uneven lighting, a gray background, or text with weak edges. The Print preset moves the image toward a document-processing result: it reduces the distraction from uneven light and increases the clarity of text edges and local contrast, making the page more suitable for reading, printing, or sharing.
It is not a printer driver and it does not choose a paper size such as A4 or Letter. It processes the image itself. Paper size, orientation, and PDF layout are still set in Imgs2PDF's PDF settings.
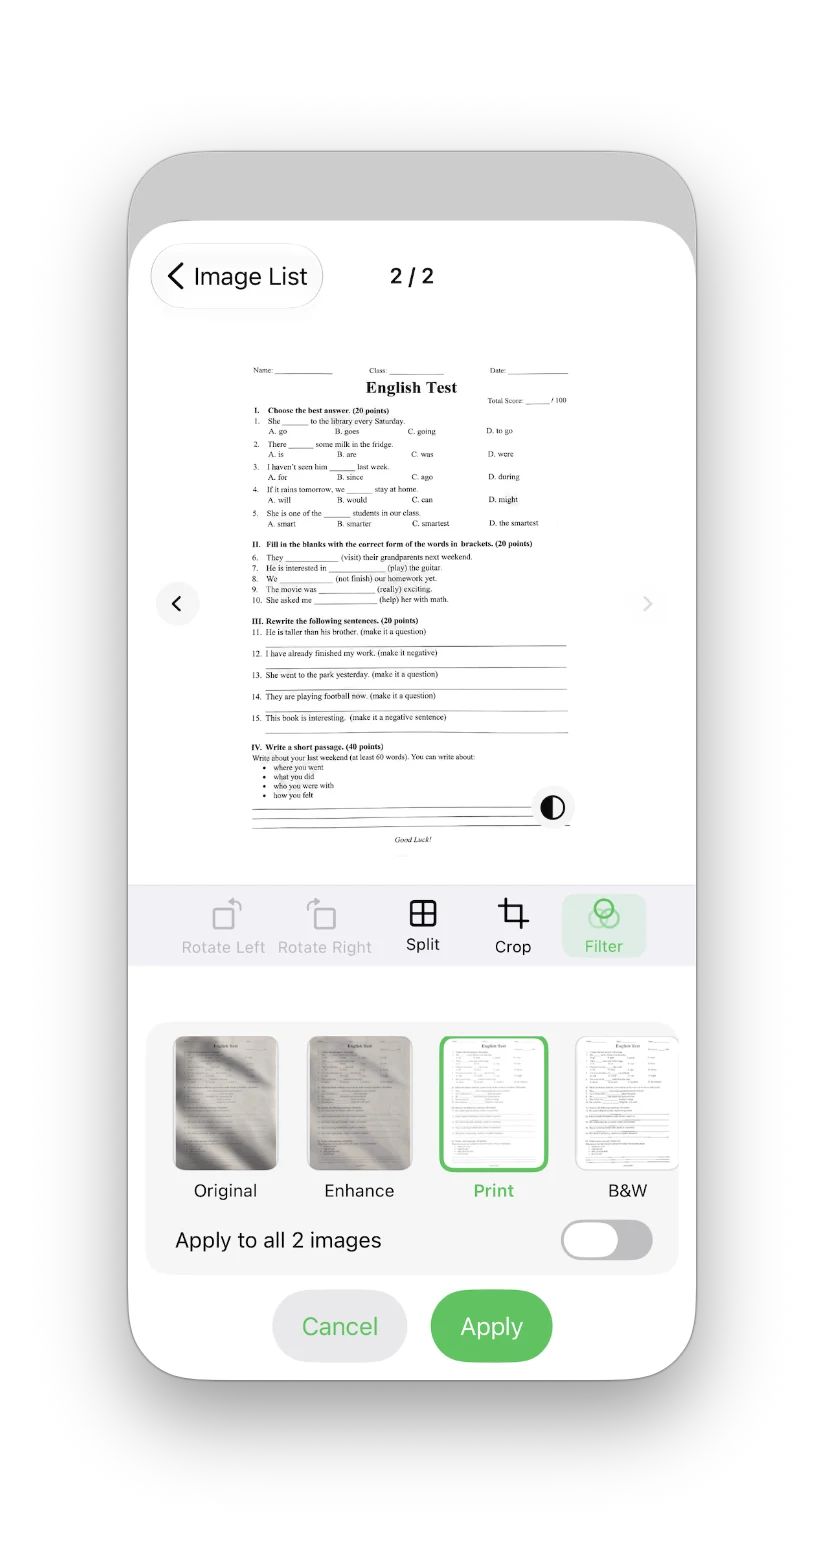
The screenshot above shows the filter panel on iPhone. The presets Original, Enhance, Print, and Black & White appear below the page. Select one to preview the result before tapping Apply.
If you want to keep the original colors, start with Original or Enhance. For pages that are mainly black text on white paper, compare Print and Black & White and choose the result that fits the page better.
How to choose among the four document filters
| Preset | Useful for | What it does |
|---|---|---|
| Original | Keeping the photo as it was captured or editing it yourself later | Does not apply an additional document filter |
| Enhance | Uneven light or faded text when page colors still matter | Improves brightness and local contrast while trying to retain color |
| Text documents, homework, forms, and pages that will be printed or shared | Moves toward grayscale, reduces uneven lighting, and strengthens text edges | |
| Black & White | Mostly black text when a more definite page is preferred | Pushes the image further toward black and white, discarding color information |
The best preset can vary from page to page. For stamps, colored annotations, or handwriting, compare Enhance and Print first. For pages that contain only text, preview Print and Black & White side by side before deciding.
Live preview, undo, and applying a filter to multiple pages
You do not have to export a result blindly. Open the Filter tool in image details, switch between presets, and inspect the preview before applying one.
If the result is not suitable, undo the change, return to the original, or choose another preset. For multi-page scans, the filter panel also includes an Apply to All Images switch:
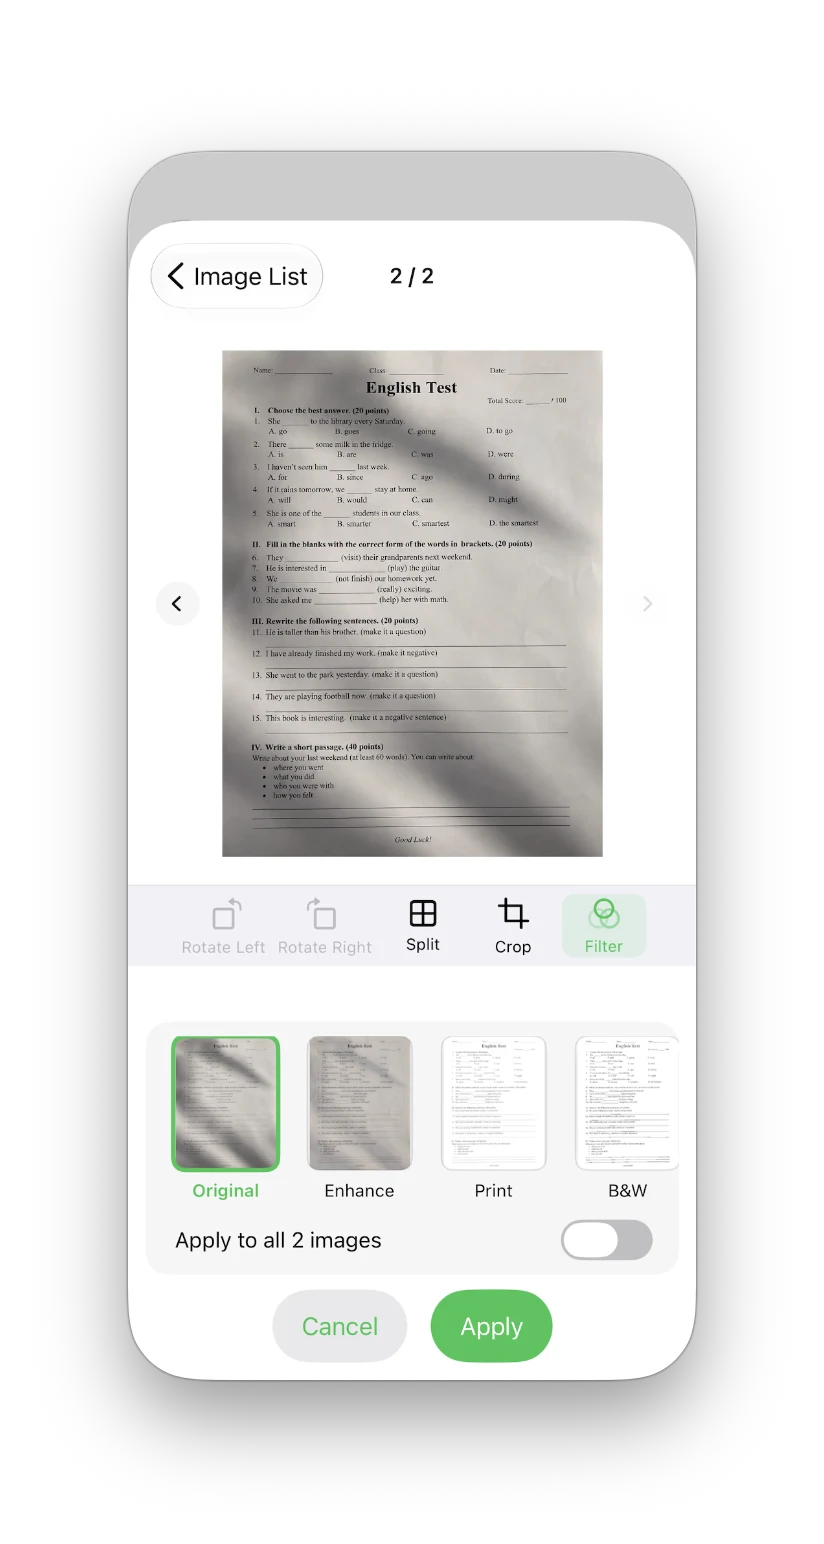
- With the switch off, only the page currently on screen is processed.
- With the switch on, the current filter can be applied to the entire group of scanned pages or selected images.
- Preview the thumbnails and result before applying it, especially when pages were captured under different lighting.
This is convenient for a set of handouts, assignments, or receipts captured in similar light. When the background and lighting vary from page to page, choosing a preset individually is usually safer.
When should you use these two new features?
Turn paper homework into a PDF
Use Scan Documents to capture several pages in sequence, then check their order in the image list. Try Print or Black & White for text-heavy pages, review the preview, and export a PDF that is ready to submit or share.
Save receipts, invoices, and expense records
Receipts often include shadows, a desk background, or a slight angle. The system scanner can help with the page boundary first; Enhance or Print can then improve readability. If a receipt has a stamp or important color, compare it with the original before choosing a stronger filter.
Process contracts, forms, and signature pages
Contracts and forms usually need to retain the complete page. Start with Original to make sure nothing was cropped, then try Print or Enhance. Do not automatically use Black & White on pages with colored signatures or stamps.
Prepare documents for printing or offline storage
The Print preset can reduce uneven lighting and improve text edges in a photo, but it does not replace the final paper-size, orientation, or printer settings. Confirm the layout in PDF settings before exporting.
What should you keep in mind?
- The camera scanning entry point is intended for iPhone and iPad. Availability also depends on whether the device supports the system document-scanning feature.
- The first use may require camera permission. If the entry point is unavailable, check the device and system permissions.
- Automatic cropping and perspective correction reduce manual work, but page edges should still be checked when there is an obstruction, low light, or a complex background.
- Print and Black & White reduce or remove some color information. Compare the preview first when a page contains stamps, colored notes, or handwriting.
- A filter improves how an image is presented; it cannot recover text that is out of focus, badly reflected, or missing entirely.
- The workflow processes files locally on the device. The screenshots and feature description in this article do not mean that original documents are uploaded.
Frequently asked questions
How is document scanning different from taking a regular photo?
Document scanning uses the system scanning interface, which is designed for capturing multiple pages and attempting to correct the page edges and perspective. A regular photo is simply an image; its edges and angle usually need more manual work afterward.
Does the Print filter connect directly to a printer?
No. Print is an image-processing preset, not a printer-control feature. It changes the way the current image is presented. Paper size, orientation, and the actual print action are still determined by PDF settings or the system share and print flow.
What is the difference between Print and Black & White?
Print aims to keep more document detail while addressing lighting and text edges. Black & White removes more color so the contrast between text and background is more pronounced. Preview both instead of treating one as the right choice for every page.
Can I apply the same filter to a multi-page scan?
Yes. For multiple images, the filter panel shows Apply to All Images. Turn it on to apply the current preset to the whole group, or leave it off to process only the current page.
Does Imgs2PDF upload scanned documents to a server?
This workflow processes the files locally and does not require the original documents to be uploaded. After creating the PDF, you can still send it through the system share menu to email, messaging apps, or cloud storage.
Summary
Imgs2PDF's Scan Documents feature turns an iPhone or iPad into a convenient entry point for capturing multi-page documents. The system handles scanning, edge detection, and perspective correction, while Imgs2PDF continues with page organization, document filters, and PDF export.
If you need to print or share paper documents, compare Original, Enhance, Print, and Black & White and choose based on the page content. For the complete Imgs2PDF workflow—including image-to-PDF conversion, PDF merging and splitting, and OCR—see the Imgs2PDF product guide or visit the Imgs2PDF product page. The HP60 product team is responsible for this article. The publication date above identifies this content version; product behavior may change after release, so consult the linked product and support pages for current limits.Content responsibility